Abstract
Web Services could be consumed by a web service client either as a standalone Java application or a web application running in a servlet/J2EE container. Consider the case where web services security requires username token. While passing user credentials from a standalone Java client is a commonly accepted criterion, consuming the same web service from a client running in a web application presents the developers with a multitude of options and challenges. One option is to use username mapping (impersonation), which could either be delegated to the host container or custom coded. In case where username mapping is not accepted, and the requirement is to use the username of the authenticated user only, the developer is confronted with the challenge of not able to retrieve the password from the session, or the underlying security registry. In such a case one of the possible solutions is to use SAML sender vouches profile. While SAML sender vouches policy with a dedicated Secured Token Service (STS) Server shifts the user re-authentication to the STS server, Weblogic’s built in SAML Credential Mapper provides a simple solution eliminating the need for a dedicated STS server, and provides the needed username token for the SAML sender vouches policy.
The literature on SAML assertion, and using credential mapper for consuming web services is non-existing. Almost all articles demonstrating web services security provide stand alone Java clients as web service consumers. In view of lack of examples on consuming web services from a web application, and using SAML assertion, an attempt is made to demonstrate SAML assertion using WebLogic Application Server, and Credential Mapper. Explained in this document are consuming web services by a standalone Java client, and client running in a web container using SAML WSS/Sender-Voches profile with and without a secured token server, setting up WebLogic Application Server as a Secured Token Server.
The entire document is divided into the following sections:
- Demonstration Web Service Description
- Environment
- Dynamic Policy
- Certificates for Message Signing
- Setting up Secure Token Service (STS)
- Web Service Provider Host Configuration
- Configuring Asserting party
- Credential Mapper, Relying Party, and Identity Assertion Field Mapping Summary
- Web Service Consumption
- Configurations Tested
- Error Messages
- Summary
- References
Demonstration Web Service Description
Weblogic Application Server provides several methods to configure Web Service Security:
- Configuring security during development
- Dynamic policy, security agnostic development, configuring the security after deployment
- Custom Policy, the security policy decided at the time of web service invocation
While a simple Java class without an interface can be used to create web services, to support custom policy an interface as shown below is used for generating the web services:
Figure 1 Class Diagram showing the Java classes used by the Web Servcie
The web service was secured by the following WS-1.2 policies:
- Wssp1.2-2007-SignBody.xml
- Wssp1.2-2007-EncryptBody.xml
- Wssp1.2-2007-Saml1.1-SenderVouches-Wss1.0.xml
Multiple use cases of the secured web service consumption were considered:
- A Java client, and a Web Application consuming web services hosted on a remote host, and a dedicated STS server
- A Java client, and a Web Application co-hosted on the STS server, consuming web services hosted on a remote host
- A web application without STS server, consuming web services hosted on a remote host
- A web application without STS server, consuming web services hosted within the same web container
Client wrapper shown below was used to consume the secured web service:
Figure 2 Client Wrapper to Consume Secured Web Service
Environment
To start the demonstration three instances of WebLogic Application Server were used:
- Host for Secured Token Service(STS) server
- Host for hosting Web Services
- Host for consuming web services through a web application
In addition the web service was consumed using a standalone Java client. The demonstration environment is shown below:
Figure 3 Environment Used for Demonstration
Establish trust between the three instances of Weblogic Application Server by exporting the identity keys of the individual servers, and importing the keys in to the respective servers’ trust stores. The three servers either can share the security repository or each server can have a dedicated repository of its own. Create users, roles, and associate users with roles on all three servers.
Dynamic Policy
Weblogic’s dynamic policy implementation was used to secure web services. Accordingly a security agnostic web service was developed. After deploying the application, the required security policies were applied to the operation meetAdministrator() as shown in the following figure:
Figure 4 Applying Policies Dynamically
Certificates for Message Signing
A public certificate and private key pair was needed to sign the message. Java keytool was used to generate the public certificate and private key pair. The certificate key pair should be different from the certificate used by the server hosting the web application, otherwise would result in a fault.
Setting up Secure Token Service (STS) Server
Secured token server is used to provide a secured token for an authenticated user. Setting up Secure Token Service requires:
- Creating Credential Mapper
- Configuring Credential Mapper
- Creating Relying Parties
- Configuring Relying Parties
- Bootstrap the policy
Creating Credential Mapper
WebLogic Application Supports the following Credential Mappers:
- SAML2CredentialMapper
- DefaultCredentialMapper
- PKICredentialMapper
- SAMLCrdentialMapper
- SAMLCredentialMapperV2
Even though multiple types of Credential Mappers are supported, only one Credential Mapper of each type can be created. SAML Credential Mapper V2 is used in this article. Assuming myrealm is the default ream,
- Navigate to the page: Security Realms->myrealm->Providers->Credential Mapping
- Click on the New button
- From the Create a New Credential Mapping Provider wizard, select SAMLCredentialMapperV2 as shown below:
Figure 5 Create a New Credential Mapping Provider
- Enter a name of your choice in the name field(SAMLCredentialMapperV2)
- Click on OK to create SAMLCredentialMapperV2
Restart the application server as required by WebLogic Application Server.
Configuring Credential Mapper
Credential mapper configuration is a pre-requisite for a Secured Token Server. Credential mapper configuration is detailed below:
- Navigate to the page: Security Realms->myrealm->Providers->Credential Mapping
- Click on the just created credential Mapper, SAMLCredentialMapperV2
- Navigate to the tab: Configuration->Provider Specific
Figure 6 Credential Mapper Configuration Wizard
- Enter a value for Issuer URI. Note that this value along with the Target URL discussed in the configuration of relaying party discussed in the next section is used by SAML Identity Asserter before serving the Web Service, by the Web Service Provider.
- Enter server’s identity alias as the value for Signing Key Alias, and identity alias’s key phrase as the value of Key Pass Phrase. Even though the form appears to let the user enter an alias of his/her choice, it was observed that only server identity certificate was accepted. In all others cases errors were thrown. May be until someone clarifies this issue, just to get going, use alias used by the server as the server identity. The Signing Key Alias used here would have to be imported by the Identity Asserter discussed later.
- The default values can be modified if needed.
- Click on Save to save the configuration.
Creating a Relying Party
Relying party is a critical component, and is used to identify the target for which the assertion is generated. Creating a relying party is detailed below:
- Navigate to the page: Security Realms->myrealm->Providers->Credential Mapping
- Click on the just created credential mapper, SAMLCredentialMapperV2
- Navigate to the tab: Management->Relying Parties
Figure 7 Creating a Relying Party
- Click on New to create a new relying party
- From the Create a New Relying Party Wizard select WSS/Sender-Vouches for the profile option
Figure 8 Selecting WSS/Sender-Vouches Profile for a New Relying Party
- Fill in the description field with your choice. It is important to enter a good description to identify the relying party as the identifying name provided by WebLogic is rp_xxxxx, and cannot be associated with a meaningful name.
- Click on OK to create the Relying Party.
Configuring the Relying Party
WSS-Sender Vouches policy is applied to an end point, and accordingly secured token is created based on the Target URL specified in the relying party configuration wizard, and is a mandatory field. Relying party configuration wizard is shown below:
Figure 9 Configuring Relying Party
- Enter URL of the Web Service end point for Target URL
- Audience URI is optional. But when configured, the value in the identity asserter, discussed later would have to match this value
- Depending on the business requirements the flag Sign Assertions could either be checked or unchecked. It should be noted that if the flag is checked, the relying party uses Signing Key Alias configured in its parent credential mapper while signing the messages.
Bootstrap
Biemond created a simple servlet to bootstrap the application server to serve as a Secured Token Server.
Web Service Provider Host Configuration
Web Service provider host needs to be configured to accept SAML tokens, and respond to the web service requests. Configuration requires the following:
- Creating Authentication Provider
- Importing Trusted Certificates
- Creating Asserting Parties
- Configuring Asserting Parties
Creating Identity Assertion Provider
Assuming myrealm as the default ream,
- Navigate to the page: Security Realms->myrealm->Providers->Authentication
Figure 10 Creating a New Identity Asserter
- Click on New
Figure 11 Creating a New Authentication Provider
- Select SAMLIdentityAsserterV2 from the dropdown combo box against the label Type
- Enter a name of your choice in the text field against the label Name
- Click on OK to create a New Authentication Provider
- Restart Weblogic Application Server as required
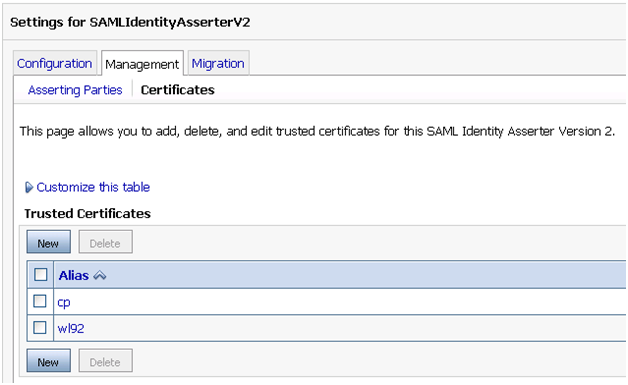
Importing Trusted Certificates
When configured to sign messages, relying parties sign messages with the configured signing certificates. Accordingly asserting parties need trusted clients’ certificates to validate the signed messages, and need to be imported into its trust store. WebLogic supports importing certificates with .pem or .der extension only. Before importing the trusted certificates, copy trusted clients’ server certificates on to the host.
- Navigate to the page: Security Realms->myrealm>Providers>Authentication
- Click on the newly created authentication provider, SAMLIdenityAsserterV2
- Navigate to Management->Certificates
Figure 12 Importing New Trusted Certificates
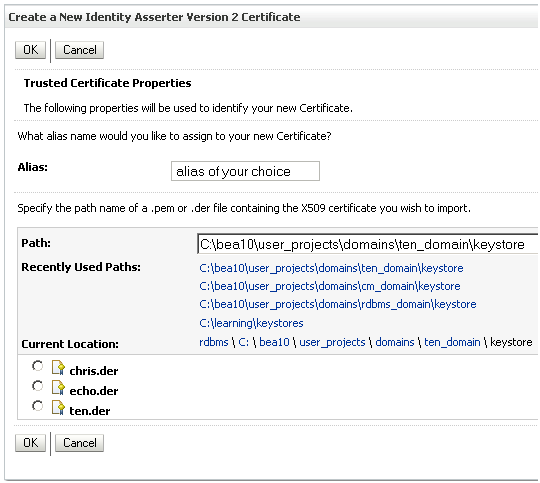
- Click on New to display the Create a New Identity Asserter Version 2 Certificate wizard shown below:
Figure 13 Importing a Trusted Certificate
- Enter a value of your choice for the Alias, typically associated with the relying party’s host
- Enter the full path of the certificate file in the Path field
- Click OK to import the certificate
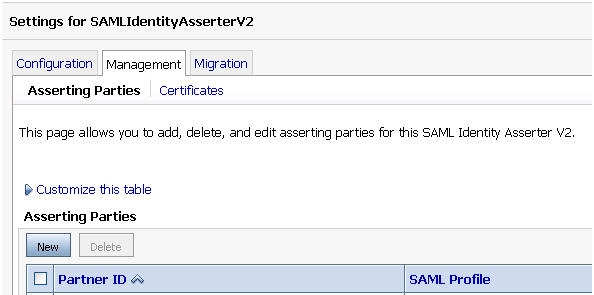
Creating Asserting Party
Identity asserters are the components which either allow or deny the web service requests. Before a secured web service request could be served, an asserting party to validate a secured request must be created and configured. To create a new asserting party;
- Navigate to the page: Security Realms->myrealm->Providers->Authentication
- Click on the newly created authentication provider, SAMLIdenityAsserterV2
- Navigate to Management->Asserting Parties
Figure 14 Creating a New Asserting Party
- Click on New to display the Asserting Party Creation Wizard
Figure 15 Create a New Asserting Party Wizard – Selecting WSS/Sender-Vouches Profile
- Select WSS/Sender-Vouches from the drop down combo box against the field labeled Profile
- Enter a value for description, to identify the asserting party
- Click on OK to create the asserting party
Configuring Asserting party
After an asserting party is created all required properties should be filled, and asserting party’s configuration should be enabled, and saved. Following steps detail configuring an asserting party:
- Click on the newly created asserting party to display the asserting party settings wizard
Figure 16 Configuring Asserting Party
- By default the asserting party is not enabled. Before creating the asserting party WebLogic validates the form fields. In case of a validation error the same form is displayed with error messages displayed on the top of the form, but without re-populating the form fields, forcing the user to re-enter the form fields, an annoyance. The work around is to enter all form fields first, and save the form by clicking the OK button. After all form fields are entered, enabling the asserting party validates the form fields, and in case of validation error, error messages are displayed on the top, but without losing the previously entered values, saving the users fingers from re-typing the form fields.
- Fill in the description field with an identity asserter’s identifying message
- The fields Target URL, Issuer URI, Audience URI correspond to the values previously entered in the relying party. These are the fields that are used to map an assertion party to a relying party. Any inaccuracy in these values prevents WebLogic to find an asserting party, resulting in the denial of authentication, and a corresponding fault.
- Depending on the business requirements either check the Signature Required Field, and enter the Assertion Signing Certificate Alias or uncheck the field. These two fields have to match with the settings on the relying party. Any deviation would result in the exception “The SAML token is not valid, it is rejected by CSS”. In addition it is critical to note that if configured to sign assertions the relying party would use its own identity certificate while signing the messages. Accordingly the identity asserter should import the relying party’s server certificate into its trust store, and configure the asserting party’s Assertion Signing Certificate Alias field to be the same as the identity certificate of the relying party.
- Similarly depending on the business requirements either check or uncheck the fields Process Groups Attributes, and Allow Virtual Users
- Once satisfied with the values of your choice, check the field Enabled, and click the Save button to enable the asserting party.
Credential Mapper, Relying Party, and Identity Assertion Field Mapping Summary
In view of the field mappings’ criticality, the field mappings between credential mapper, relying party, and asserting party are summarized below: Secured Token Server Web Service Provider Credential Mapper Asserting Party Issuer URI Issuer URI Signing Key Alias Assertion Signing Certificate Alias Relying Party. Target URL Target URL Audience URI Audience URI Sign Assertions Signature Required
Web Service Consumption
Since the current solution is specific to WebLogic Application Server, WebLogic Application Server’s specific classes are used for consuming Web Services. ClientBSTCredentialProvider is used for specifying the required properties.
For a standard Java client when using a separate STS server the required properties are:
- Endpoint URL
- Username
- Password
- Url of the Secured Token Service
- Web Service host’s identifying server certificate used for encrypting the message
- Public certificate, and private key used by the client for signing the message When using WSS/Sender-Vouches profile, username and password are not required as the username token is provided by WebLogic runtime, and Secured Token Server is also not required.
Configurations Tested
As described earlier various configurations were tested. The configurations tested are shown in the following figures:
Figure 17 Various Components Used for Web Service Consumption
Figure 18 Web Service Client and STS Host within the same web container
Figure 19 Remote Web Service Host, and Web Service Client without STS
Figure 20 Web Service Client, without STS, and Web Service Host within the same web container
Configuration Summary
Credential mapper, and relying party are independent entities. Assertion parties properties are dependent on the configuration properties of credential mapper, and relying party. Table 1 summarizes the properties of credential mappers, and Table 2 summarizes the properties of relying parties configured in the demonstration.
Table 1 Credential Mapper
| Property | cp | sts | Remarks |
| Issuer URI | cp:16002 | sts:7002 | Identifier |
| Name Qualifier | cp:16002 | sts:7002 | |
| Default Time to Live | 120 | 120 | Default |
| Default Time to Live Offset | -5 | -5 | Default |
| Signing Key Alias | cp | sts | |
| Signing Key Pass Phrase | <secret> | <secret> | |
| Confirm Signing Key Pass Phrase | <secret> | <secret> | |
| Default Name Mapper Class Name | | | Default |
Table 2 Relying Party
| Property | cp | sts | Remarks |
| Enabled | Checked | Checked | |
| Description | Good description | Good description | Enter good description |
| Target URL | https://rdbms:9002/HttpsBasicAuth/HttpsBasicAuthImpl | https://rdbms:9002/HttpsBasicAuth/HttpsBasicAuthImpl | |
| Audience URI | /HttpsBasicAuth/HttpsBasicAuthImpl | /HttpsBasicAuth/HttpsBasicAuthImpl | |
| Name Mapper Class | | | |
| Assertion Time To Live | 0 | 0 | Default |
| Assertion Time To Live Offset | 0 | 0 | Default |
| Sign Assertions | Checked | Checked | |
| Include Keyinfo | Checked | Checked | |
| Include DoNotCacheCondition | | | Default |
| Include Groups Attribute | Checked | Checked | |
Table 3 summarizes asserting party configuration when Secured Token Server is used. While the property Target URL corresponds to the end point URL of the web service, and is dependent on the web service provider’s host, the property Assertion Signing Certificate Alias is the Signing Key Alias configured in the Credential Mapper of the Secured Token Server.
Table 3 Asserting Party Configuration when Secured Token Server is used
| Property | Web Service Provider is cp | Web Service Provider is rdbms | Remarks |
| Secured Token Server Host is cp | Secured Token Server Host is cp | Secured Token Server Host is sts |
| Enabled | checked | checked | Checked | |
| Description | | | | |
| Target URL | https://cp:16002/HttpsBasicAuth/HttpsBasicAuthImpl | https://rdbms:9002/HttpsBasicAuth/HttpsBasicAuthImpl | https://rdbms:9002/HttpsBasicAuth/HttpsBasicAuthImpl | |
| Issuer URI | | | | |
| Audience URI | /HttpsBasicAuth/HttpsBasicAuthImpl | /HttpsBasicAuth/HttpsBasicAuthImpl | /HttpsBasicAuth/HttpsBasicAuthImpl | |
| Name Mapper Class | | | | |
| Signature Required | checked | checked | checked | |
| Assertion Signing Certificate Alias | cp | cp | sts | |
| Process Groups Attribute | checked | checked | checked | |
| Allow Virtual Users | checked | checked | Checked | |
Error Messages
Some of the error messages that were seen, and the solution to solve the error message are listed below:
Error Message:Unable to generate SAML Assertion: Assertion configuration not found
Probable cause: STS server is not configured to create an assertion for the specified TargetURL,
Error Message: weblogic.wsee.jaxrpc.soapfault.WLSOAPFaultException: Security token failed to validate. weblogic.xml.crypto.wss.SecurityTokenValidateResult@1c207de[status: false][msg The SAML token is not valid, it is rejected by CSS ]
Probable Cause(s):
- Audience URIs in the identity asserter and relying party did not match
- The flags Sign Assertions on Identity Asserter and Signature required on Relying party do not match(are not the same)
- Signing certificate on Identity asserter is not the same as server certificate of the STS server
Error Message: [java] java.rmi.RemoteException: SOAPFaultException - FaultCode [{http://schemas.xmlsoap.org/ws/2005/02/trust}InvalidRequest] FaultString [The request was invalid or malformed] FaultActor [null] Detail [weblogic.wsee.security.wst.faults.InvalidRequestException: Connection refused: connect
Probable Cause: The STS server may not be responding
Error Message: [java] java.rmi.RemoteException: SOAPFaultException - FaultCode [{http://docs.oasis-open.org/wss/2004/01/oasis-200401-wss-wssecurity-secext-1.0.xsd}InvalidSecurity] FaultString [Error on verifying message against security policy Error code:4000] FaultActor [null]No Detail; nested exception is: [java] weblogic.wsee.jaxrpc.soapfault.WLSOAPFaultException: Error on verifying message against security policy Error code:4000
Probable Cause: Trying to consume web service from a web application, and the public certificate, and private key for signing the message are the same as the identity certificate of the host, hosting the web application By no means, the message list is complete and more error messages could show up during configuration and testing.
Summary
Weblogic server specific credential mapper, relying party, and asserting party together could be configured to serve multiple configurations of WSS/Sender-Vouches profile to consume web services hosted locally or remotely with and without a dedicated STS server. Listed were some of the errors resulted during development, and possible root causes of the error messages.
References
• “http://biemond.blogspot.com/2009/10/securing-web-services-with-saml-sender.html “, Blog by Edwin Biemond